Patellar Dislocation: What's Getting Relocated?
- golabiromtin
- Jul 15, 2024
- 6 min read

Updated: Jun 23, 2025
By Romtin G.
Before reading this article, check out our Instagram page where we'll have infographics on each article topic. They're perfect if you want a short introduction before reading the article, or if you want to get a general idea of the topic without reading the entire post. Here's the infographic in case you want to see it on our website instead: Infographic 1
I’m sure you’ve heard of dislocation before. Whether it’s a career dislocation because you got fired, geographical dislocation of crops and farmers due to climate change, or joint dislocations from extreme force on a ligament, they all mean that something moved where it shouldn’t be. In my case, with two kneecap (patellar) dislocations, I have plenty of experience with joint dislocations to share on what really happens, as well as some genetically predisposed and lifestyle risk factors that one can have to be at a higher risk of knee dislocations.
Before I get into the biology behind a patellar dislocation, I’d like to talk about the timeline of a knee dislocation from the moment you dislocate to full recovery. When you dislocate your kneecap, you feel like your knee just buckled super quickly and then went back into place, or it just stays out of position. You might try to walk on it, but eventually, you’ll realize that if it’s not too painful, your knee is too swollen to even move. At this point, you’d have to go to the emergency room, where they’ll take an X-ray of your knee, give you an immobilizing splint that’ll cover your whole leg along with crutches, and schedule an appointment with an orthopedic doctor that will help you work through the situation and schedule an MRI that will analyze any soft tissue damage. Swelling will peak in the first 24-48 hours, and you can use medications like ibuprofen and advil to help with swelling and pain. For the first week, you must wear crutches to immobilize the knee and prevent further damage. Depending on how you feel, you can remove the crutches and walk freely with a knee brace (make sure you ask your doctor for one – they’re really expensive!) during weeks 2-6. You will also begin physical therapy at this time frame, with gentle range-of-motion exercises to reduce stiffness, maintain muscle strength, and promote healing. By weeks 6-12, swelling should significantly reduce, and physical therapy will use strengthening and balancing exercises to restore normal function and prevent further injury. Depending on progress in physical therapy, some athletes return to light activities after 3-6 months. After 6-12 months, physical therapy at the clinic will stop, but you will be given exercises to perform 2-3 times a week to keep your muscles strong and prevent another dislocation. At this point, you’ve fully recovered from the dislocation, and it is your choice to continue wearing the knee brace. Personally, I choose to wear it almost always because it’s comfortable and gives me physical support and peace of mind while I do different activites.
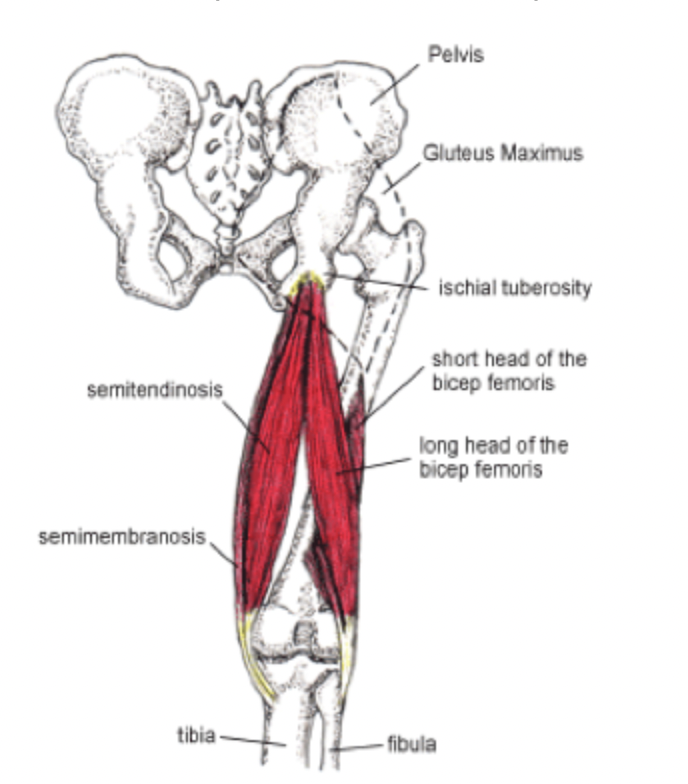
Now, let’s get into the mechanics of a dislocation! A patellar dislocation occurs when the bones that form the knee cap are laterally (to the side) forced out of their normal alignment. The knee cap (patella) is a protective piece of bone in the knee joint that is connected to the quadriceps through the quadriceps tendon, and it functions to allow for vertical movement of the knee joint within a groove (the patellofemoral groove). The mechanism behind a knee dislocation involves the tear of the medial patellofemoral ligament (MPFL), which often results in the patella knocking into other bones and causing bony contusion (bone bruising) in bones such as the lateral femoral condyle (a part of the lower end of the femur, which is the thigh bone). One way they can be categorized is by how the tibia (shin bone) has moved relative to the femur (the Kennedy system). There are several possible directions of displacement, including anterior (forward), posterior (backward), lateral (toward the outside), or medial (toward the inside). This system helps establish the reduction maneuver – the movements the doctor needs to make to realign your knee after it’s been dislocated (think of those chiropractor videos) – necessary depending on which direction the knee has moved; however, almost 50% of knee dislocations self-reduce before formal evaluation: that is, they go back into place by themselves. That was the case of my knee dislocation, and it happened almost as instantly as the dislocation itself happened, without any pain. This pattern of self-reducing is pervasive, which is one of the limitations of this classification system. To overcome this, another classification system (the Schenck system) differentiates between dislocations using the ligaments impacted by the episode. Some different ligaments include the anterior cruciate ligament (ACL), the posterior cruciate ligament (PCL), the medial collateral ligament (MCL), and the lateral collateral ligament (LCL), all of which have different tests that can be performed upon examination to determine the extent of injury. A few risk factors include having a weak vastus medialis obliqus (VMO), a muscle that helps stabilize your knee; patella alta, which means having a higher-riding patella that doesn’t sit directly in its groove; and trochlear dysplasia, the anatomical defect in which the patellofemoral groove is flat or concave, giving the patella little to no place to grip.
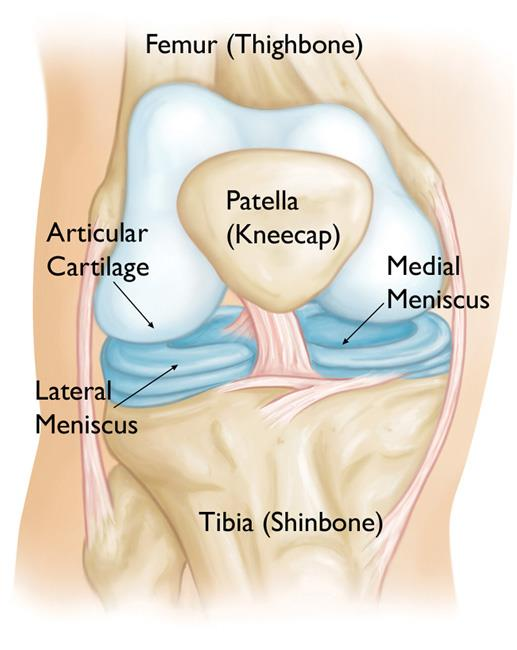
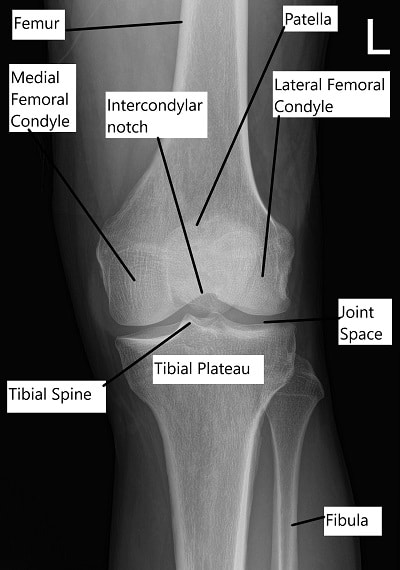
Once the knee has been reduced in the emergency room (or once it has self-reduced), an X-ray is necessary of the anterior, posterior, and medial sides of the knee. This helps confirm the knee joint has actually reduced (to ensure that the injury is a patellar dislocation) and the presence or absence of bone fragments with cartilage attached to them (an indicator of necessary surgery if the piece is greater than 1 centimeter long). An MRI is necessary to see the extent of soft tissue damage, ligament damage, and most importantly, CARTILAGE DAMAGE. Hyaline cartilage (the cartilage you’re born with) is the holy grail of joints and makes them move smoothly without issue. The ends of the femur, tibia, and the back of the patella are covered in a type of hyaline cartilage called articular cartilage, so a dislocation of the patella often causes scraping of the cartilage against the bone, leading to cartilage breakdown, or chondrosis. It’s vital to minimize cartilage wear throughout your life as cartilage is avascular – it doesn’t have any vessels to carry blood to the tissue, limiting its regeneration capabilities. Osteoarthritis (arthritis in the knee) and other joint problems stem from the wearing away of cartilage over time. Your body can mildly regenerate a sort of cartilage called fibrocartilage, but it’s not as good as the one you have naturally. Compared to hyaline cartilage’s smooth and developed extracellular matrix composed of only one type of collagen, fibrocartilage is composed of an extracellular matrix that includes two types of collagen, which makes it more uneven and patchy. Hyaline cartilage also comprises more proteoglycans, chondrocytes (cartilage cells), and water, giving it a gel-like and smooth consistency. Fibrocartilage has a tougher consistency as it doesn’t have these features to the same extent. However, it is better than having no cartilage, as it does have tensile strength and is naturally found in places that receive lots of force, such as the intervertebral disks. My first knee dislocation had minimal cartilage damage, although I did notice a small nick in my articular cartilage. Even though I was wearing a knee brace, my second dislocation resulted in the avulsion (the pulling away) of a fragment of cartilage from my patella, and now my chances of getting osteoarthritis early are way higher. However, some studies demonstrate hyaline cartilage regeneration in vitro, so hopefully, by the time I get to the point of having osteoarthritis, there’ll be a solution!
Finally, I’d like to end by recapping. When the patella is forced out of alignment, it often results in a patellar dislocation, leading to ligament tears and bone bruising. Dislocations are categorized by the direction the tibia moves relative to the femur, but almost half self-reduce without intervention. Another classification focuses on the affected ligaments. Risk factors for dislocation include a weak VMO muscle, high-riding patella (patella alta), and flat patellofemoral groove (trochlear dysplasia). Post-reduction, X-rays confirm proper alignment and check for bone fragments, while MRIs assess soft tissue and cartilage damage. Hyaline cartilage, essential for smooth joint movement, often gets damaged during dislocations, leading to arthritis due to its limited regenerative capacity.
My next article will be about a surgery that I’ll be having this winter, called a tibial tubercle osteotomy (TTO). In short, it realigns the bones in my knee, combatting the genetic risk factors I have, ensuring I don’t dislocate my knee again. Thanks for reading!
Sources: